Is your robot vacuum’s side brush not spinning? Don’t worry.
We have an easy fix guide for you. Robot vacuums are handy devices that keep our floors clean with minimal effort. But sometimes, even the best gadgets face issues. One common problem is the side brush not spinning. This can affect your vacuum’s efficiency.
In this guide, we will help you understand why this happens and how to fix it. You don’t need to be a tech expert. With a few simple steps, your robot vacuum will be back to its best in no time. Keep reading to learn how to troubleshoot and fix this issue quickly and easily.
Common Causes
When your robot vacuum’s side brush stops spinning, it can be frustrating. Understanding the common causes can help you fix the problem quickly. Let’s dive into some typical reasons why the side brush may not work.
Debris Blockage
One of the most frequent causes is debris blockage. Small objects like hair, dust, or threads can get stuck in the brush. This can stop it from spinning.
Follow these steps to clear the blockage:
- Turn off the robot vacuum.
- Remove the side brush.
- Check for any visible debris.
- Use a small tool to clear the blockage.
- Reattach the side brush and turn the vacuum on.
Worn Out Brushes
Another common reason is worn out brushes. Over time, brushes can wear out and lose their effectiveness. This can prevent them from spinning properly.
To check if the brushes are worn out:
- Inspect the side brush for signs of wear and tear.
- Look for bent or missing bristles.
- Check if the brush feels loose or wobbly.
If the brush is worn out, replace it with a new one. Most robot vacuums come with spare brushes. If not, you can easily find replacements online or at a store.
By understanding these common causes, you can keep your robot vacuum working efficiently.
Tools Needed
To fix the side brush of your robot vacuum not spinning, you will need some tools. These tools are essential for troubleshooting and fixing the issue. Let’s explore the necessary tools in detail.
Screwdrivers
A set of screwdrivers is crucial for opening the robot vacuum. Phillips head and flat head screwdrivers are the most common types needed. The screws on the vacuum may vary in size. Ensure you have multiple sizes of screwdrivers. This will help you avoid stripping the screws.
Using the right screwdriver makes the process easier. It also ensures that you do not damage the vacuum. Keep your screwdrivers handy for efficient repair work.
Cleaning Brush
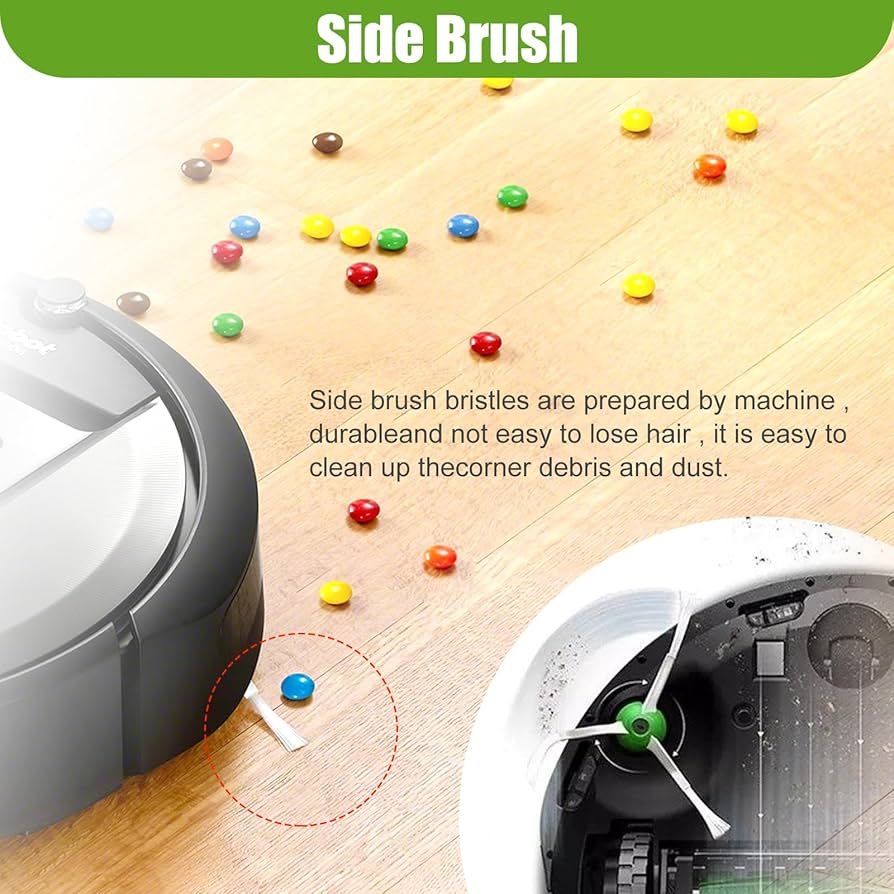
A cleaning brush is another essential tool. The side brush of the robot vacuum can get clogged with dirt and debris. A cleaning brush helps in removing this buildup. It ensures the side brush spins freely.
There are different types of cleaning brushes available. Soft bristle brushes work best for this task. They do not damage the side brush while cleaning. Regular cleaning with a brush can prevent future issues. Make sure to clean the area around the side brush thoroughly.
| Tool | Purpose |
|---|---|
| Screwdrivers | Opening the robot vacuum |
| Cleaning Brush | Removing dirt and debris |
Initial Inspection
Is your robot vacuum’s side brush not spinning? Performing an initial inspection can help diagnose and fix the issue. This guide will walk you through the steps to get your vacuum back in working order.
Check Power
First, ensure your robot vacuum has enough power. A low battery can affect the brush’s performance. Charge the vacuum fully and then test the brush again.
If your robot vacuum is on, but the brush is not spinning, try resetting the device. Some models have a reset button. Check the manual for specific instructions.
| Step | Action |
|---|---|
| 1 | Check battery level |
| 2 | Fully charge the vacuum |
| 3 | Reset the device |
Examine Brush
Next, inspect the side brush itself. Debris can get tangled in the bristles, stopping it from spinning. Remove the brush and clean it thoroughly.
Check for any damage to the brush or its base. A broken or loose brush will not spin correctly. If damaged, replace the brush with a new one.
- Remove any hair or debris
- Inspect the brush for damage
- Ensure the brush is securely attached
Use a small tool to clean the area around the brush base. Dust and dirt can build up and interfere with the brush’s movement.
By following these steps, you can often fix the issue and get your robot vacuum working properly again.
Cleaning The Brush
Is your robot vacuum’s side brush not spinning? A clogged or dirty brush might be the culprit. Cleaning the brush is an easy fix. Follow these steps to get your vacuum back in action.
Remove Debris
First, turn off your robot vacuum. This ensures safety while you work.
Next, locate the side brush. It is usually on the bottom of the vacuum.
- Gently pull the side brush to remove it from the vacuum.
- Inspect the brush for any visible debris.
- Use your fingers or a small tool to remove hair, dust, and other particles.
Clearing debris can often solve the problem. If the brush still does not spin, proceed to the next step.
Deep Cleaning
Sometimes, a simple debris removal is not enough. A deeper clean may be necessary.
- Fill a small bowl with warm, soapy water.
- Submerge the side brush in the water. Let it soak for a few minutes.
- Use a soft brush or cloth to scrub the brush. Focus on the bristles and the base.
- Rinse the brush under running water. Ensure all soap is removed.
- Dry the brush thoroughly with a towel. Let it air dry completely before reattaching.
Once the brush is dry, reattach it to the vacuum. Test to see if it now spins correctly.
If the side brush still does not spin, the issue might be mechanical. In such cases, consult the vacuum’s manual or contact customer support for further assistance.
Replacing The Brush
If your robot vacuum’s side brush is not spinning, replacing it might solve the problem. This guide will walk you through the steps to purchase and install a new brush. Following these steps ensures your vacuum works efficiently again.
Purchase New Brush
First, you need to buy a new brush. Check your vacuum’s model number. This is important to find the correct brush. You can find this information in the user manual or on the vacuum itself.
Visit the manufacturer’s website or a trusted online store. Search for the brush specific to your model. Make sure to read reviews and check ratings to ensure quality. You can also visit a local electronics store if you prefer.
Installation Steps
After purchasing the new brush, follow these steps to install it:
- Turn off the vacuum: Ensure the vacuum is powered off and unplugged. This prevents any accidental starts during the replacement.
- Remove the old brush: Locate the side brush on your vacuum. Use a screwdriver if necessary. Unscrew or detach the old brush carefully.
- Clean the area: Clean any dust or debris where the new brush will be installed. Use a soft cloth or brush for this step.
- Attach the new brush: Place the new brush in the correct position. Align it with the screw holes or attachment points.
- Screw or snap in place: Secure the new brush by screwing it in or snapping it into place. Make sure it is firmly attached.
- Test the vacuum: Turn on the vacuum to ensure the new brush spins correctly. Check for any unusual noises or problems.
Following these steps will help you replace the side brush easily. Keeping your vacuum’s brushes in good condition ensures optimal cleaning performance.

Credit: www.dreametech.com
Motor Issues
A common problem with robot vacuums is the side brush not spinning. One major cause could be motor issues. The motor is essential for the brush’s movement. Without it, the side brush won’t spin. Let’s explore how to diagnose and fix motor problems.
Diagnose Motor
To diagnose motor issues, start by checking the power supply. Ensure the robot vacuum is fully charged. A low battery can affect motor performance.
Next, listen for any unusual sounds. A faulty motor may produce a grinding noise. If you hear this, the motor might be damaged.
You can also use a multimeter to check the motor’s electrical connections. Ensure there is a consistent flow of current. If the connections are loose, the motor will not function properly.
Repair Or Replace
If you have diagnosed a motor issue, you may need to repair or replace it. For minor problems, such as loose wires, you can try tightening the connections.
If the motor is damaged beyond repair, replacing it is the best option. Follow these steps for replacing the motor:
- Turn off and unplug the vacuum.
- Remove the side brush and the cover.
- Disconnect the motor from the vacuum.
- Install the new motor and reconnect it.
- Replace the cover and side brush.
- Turn on the vacuum and test the brush.
Always refer to the user manual for specific instructions. Each model may have different steps.
By following these steps, you can ensure your robot vacuum’s side brush spins smoothly. Proper maintenance will extend the life of your device.
Preventive Maintenance
Preventive maintenance is crucial to keep your robot vacuum working smoothly. It helps avoid issues like the side brush not spinning. Regular upkeep ensures your device performs optimally and extends its lifespan.
Regular Cleaning
Regular cleaning of your robot vacuum is essential. Dust and debris can clog the side brush mechanism. Follow these steps:
- Remove the side brush.
- Use a small brush to clean the bristles.
- Clear any hair or threads wrapped around the brush.
- Check the brush housing for blockages.
- Reattach the side brush securely.
Perform this cleaning weekly to prevent build-up. A clean brush spins freely and picks up more dirt.
Scheduled Inspections
Scheduled inspections help catch issues early. Set a reminder to inspect your robot vacuum monthly. During inspections, follow these steps:
- Check the side brush for wear and tear.
- Inspect the brush motor and gears.
- Ensure all screws are tight.
- Test the side brush rotation manually.
- Run a short cleaning cycle to verify performance.
Regular inspections help identify problems before they worsen. This proactive approach saves time and money on repairs.
By maintaining your robot vacuum, you ensure it operates at peak efficiency. Clean and inspect it regularly to avoid common issues like the side brush not spinning.

Credit: www.amazon.com
Professional Help
Sometimes, fixing a robot vacuum’s side brush on your own isn’t enough. In such cases, seeking professional help can save time and effort. Technicians have the tools and expertise to diagnose and resolve complex issues. Below, we’ll explore when to seek help and how to find reliable technicians.
When To Seek Help
If your robot vacuum’s side brush continues to malfunction, it might be time to call a professional. Here are some scenarios where professional help is advisable:
- Unusual Noises: If your vacuum makes strange sounds, it may indicate a mechanical issue.
- Repeated Failures: If the side brush stops spinning repeatedly, there could be a deeper problem.
- Error Codes: If your vacuum displays error codes that you can’t fix, a technician can help.
- Warranty Concerns: If your vacuum is under warranty, professional repairs might be required to maintain coverage.
Finding Technicians
Finding the right technician ensures your robot vacuum gets the best care. Here are some tips to help you:
- Check Manufacturer’s Website: Many manufacturers list authorized service centers. This ensures technicians use genuine parts.
- Online Reviews: Look for customer reviews on platforms like Google and Yelp. Positive feedback indicates reliable service.
- Ask for Recommendations: Friends or family might know trustworthy technicians.
- Local Listings: Websites like Angie’s List or HomeAdvisor can help you find local repair services.
With the right professional help, your robot vacuum can be back to its optimal performance in no time.

Credit: m.youtube.com
Frequently Asked Questions
Why Is My Robot Vacuum Side Brush Not Spinning?
The side brush might be clogged with debris. Check and clean it regularly. Additionally, a loose or broken brush motor could be the issue.
How Do I Fix A Stuck Side Brush?
Turn off the vacuum and remove the side brush. Clean any debris and reattach it securely.
Can A Broken Motor Affect The Side Brush?
Yes, a malfunctioning motor can stop the side brush from spinning. Consider replacing the motor if necessary.
How Often Should I Clean The Side Brush?
Clean the side brush after every use or at least once a week. This ensures optimal performance.
Conclusion
Fixing a robot vacuum side brush is simpler than you think. Follow the steps outlined to get your vacuum working again. Regular maintenance can prevent future issues. Keep an eye on brushes, screws, and debris. This ensures smooth operation and longer vacuum life.
Always refer to your vacuum’s manual for specific guidance. Happy cleaning!