Is your vacuum cleaner suddenly losing power or making strange noises? The problem might be with your vacuum cleaner motor.
Fixing it yourself can save you time and money, but only if you know the right steps. In this guide, you’ll learn simple, clear instructions to troubleshoot and repair your vacuum motor. By the end, you’ll feel confident getting your vacuum back to full strength without calling a repair shop.
Keep reading—your cleaner, quieter home is just a few fixes away.
Credit: home.howstuffworks.com
Common Motor Issues
Vacuum cleaner motors face many common issues. These problems can stop your vacuum from working well. Understanding these issues helps you fix the motor faster. Keep an eye on signs that show motor troubles. Knowing what causes motor failure helps prevent future damage.
Signs Of Motor Problems
Your vacuum may show clear signs of motor problems. It might make strange noises like grinding or buzzing. The vacuum could lose suction power suddenly. Sometimes, it smells like burning plastic or rubber. The motor may stop working after a short time. Another sign is the vacuum turning on and off by itself. Watch for these signs to catch motor issues early.
Causes Of Motor Failure
Motor failure happens for many reasons. Dust and dirt can clog the motor parts. Overheating from long use without breaks can damage the motor. Worn-out brushes inside the motor reduce its power. Loose or broken wires stop electricity flow to the motor. Running the vacuum with a full bag strains the motor. These causes harm your vacuum’s motor and reduce its life.
Safety Precautions
Fixing a vacuum cleaner motor requires care and attention. Safety is the first step. Following safety rules protects you from injury and damage. Take time to prepare before starting any repair work. A safe approach helps the job go smoothly and prevents accidents.
Unplugging And Handling
Always unplug the vacuum cleaner before opening it. Electricity can cause shocks or short circuits. Handle the vacuum gently to avoid breaking parts. Keep the power cord away from sharp edges and water. Never touch the motor or wires with wet hands. Proper handling reduces risks during repair.
Using Protective Gear
Wear protective gloves to keep your hands safe. Gloves stop cuts, burns, and dirt from reaching your skin. Use safety glasses to protect your eyes from dust and debris. A mask can prevent inhaling dust inside the vacuum. Protective gear makes the repair process safer and cleaner.
Tools And Materials Needed
Fixing a vacuum cleaner motor needs the right tools and materials. Using proper items makes repair easier and safer. You can avoid damage and get the motor working again fast.
Gather everything before starting. This saves time and keeps the process smooth. Here is what you will need for the job.
Basic Hand Tools
Screwdrivers are essential for opening the vacuum. Use both flathead and Phillips types. A small wrench set helps remove nuts and bolts. Needle-nose pliers assist in gripping small parts and wires.
Multimeter
A multimeter checks electrical parts and circuits. It helps find broken wires or faulty motor components. Choose a simple model with voltage and resistance settings. This tool is key for motor diagnosis.
Replacement Parts
Common parts to replace include brushes, belts, and motor bearings. Check your vacuum model for exact parts needed. Having spares ready avoids delays during repair. Use genuine or high-quality parts only.
Cleaning Supplies
Dust and dirt affect motor performance. Use a soft brush or compressed air to clean. Rubbing alcohol and cotton swabs help remove grease and grime. Keeping parts clean improves motor life.
Safety Gear
Protect your eyes with safety goggles. Use gloves to avoid cuts or electric shocks. Work in a well-lit and dry area. Safety ensures a smooth and injury-free repair process.

Credit: www.youtube.com
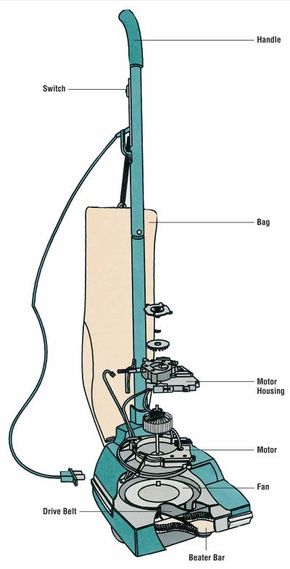
Accessing The Motor
Accessing the motor is a key step in fixing a vacuum cleaner. The motor is inside the vacuum body. You must carefully open this to reach the motor parts. This guide helps you open and find the motor safely.
Removing The Vacuum Housing
First, unplug the vacuum cleaner. Find all screws on the vacuum housing. Use a screwdriver to remove these screws. Keep the screws in a safe place. Gently pull apart the housing. Some models may have clips; press them carefully. Avoid forcing the housing open to prevent damage.
Locating The Motor
With the housing removed, look inside the vacuum. The motor is usually a round or cylindrical part. It connects to the fan and power wires. Check for any loose wires or parts near the motor. Make sure to note the motor’s position for reassembly.
Cleaning The Motor
Cleaning the motor is a key step in fixing a vacuum cleaner motor. Dirt and dust can block parts inside. This causes the motor to work harder or stop working. Regular cleaning helps keep the motor cool and running well. It also makes the vacuum last longer.
Removing Dust And Debris
Start by unplugging the vacuum. Open the motor cover carefully. Use a soft brush or compressed air to remove dust. Blow air gently to avoid damage. Clean all corners where dust gathers. Remove any large debris by hand. Make sure no dust stays on the motor parts. This keeps the motor safe and clean.
Cleaning Brushes And Bearings
Motor brushes wear out with use. Check them for dirt or damage. Use a small brush to clean the brushes. Remove dust from the bearing area. Bearings help the motor spin smoothly. Clean bearings carefully with a cloth. Avoid using water to stop rust. Clean brushes and bearings help the motor run well and avoid noise.
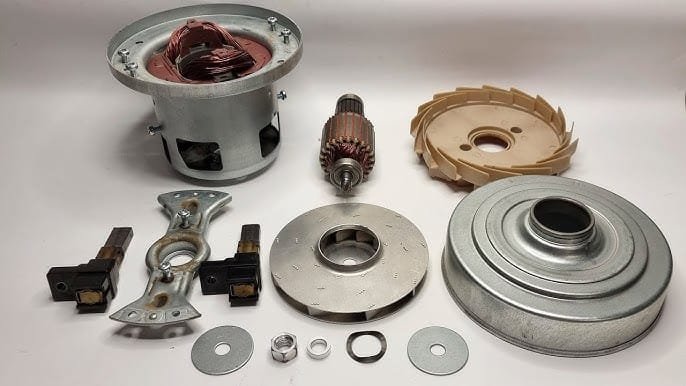
Inspecting Motor Components
Inspecting motor components is an important step to fix a vacuum cleaner motor. The motor has parts that wear out or get dirty over time. Checking these parts helps find the problem fast. Careful inspection can save money and extend the vacuum’s life. Always unplug the vacuum before starting any checks.
Checking Brushes And Springs
Brushes make contact with the motor to carry electricity. Over time, brushes wear down and need replacement. Look for cracks or short lengths on the brushes. Springs hold brushes in place and keep pressure on them. Check springs for breaks or loss of tension. Clean any dust or dirt around brushes and springs. Worn brushes or weak springs cause poor motor performance.
Examining The Armature And Commutator
The armature spins inside the motor. The commutator is the part that touches the brushes. Check the armature for signs of burning or damage. Look for dirt or grease on the commutator. Use fine sandpaper to clean a dirty commutator gently. Avoid deep scratches or uneven surfaces. A damaged armature or commutator can stop the motor from running well.
Replacing Damaged Parts
Replacing damaged parts is key to fixing a vacuum cleaner motor. Worn or broken parts cause poor performance or no power. Replacing these parts brings the motor back to life. This process saves money and extends the vacuum’s life.
Focus on the motor brushes and other main components. These parts wear out from use. Finding the right replacements and installing them correctly ensures good results. Careful steps make the repair easier and safer.
Sourcing Replacement Brushes
Start by identifying the brush type for your vacuum model. Check the user manual or the motor label. Use the exact size and shape for best fit. Look for brushes made of quality carbon material. Carbon brushes wear down but conduct electricity well.
Buy brushes from trusted parts sellers or the vacuum brand store. Avoid cheap or generic brushes that wear out fast. Confirm the brushes match your motor’s voltage and size. Proper brushes reduce motor damage and noise.
Installing New Components
Turn off and unplug the vacuum before starting. Open the motor housing carefully using a screwdriver. Remove the old brushes by pulling them from their holders. Note the brush springs and wiring positions.
Insert the new brushes into the holders. Make sure they fit snugly and touch the motor’s commutator. Reattach springs and wires securely. Close the housing and tighten screws. Test the vacuum to check motor power and sound.

Credit: diy.stackexchange.com
Testing The Motor
Testing the motor is a key step in fixing your vacuum cleaner. It helps you find out if the motor works right after repair. This step saves time and avoids extra problems later. Follow clear steps to test the motor safely and correctly.
Reassembling The Vacuum
Put the motor back into the vacuum carefully. Make sure all parts fit as they were before. Tighten screws and clips firmly but gently. Check wires and connectors are secure and not loose. Keep the vacuum’s outer casing clean and undamaged. A good reassembly keeps the motor safe and ready.
Running Performance Tests
Plug the vacuum into power and turn it on. Listen closely to the motor’s sound for smooth running. Watch for strange noises like grinding or buzzing. Check if the motor runs at full speed without stopping. Test suction power by vacuuming a small area. A strong suction shows the motor works well. Stop the vacuum if you see smoke or smell burning. These signs mean the motor has a problem.
Preventive Maintenance Tips
Preventive maintenance helps keep your vacuum cleaner motor working longer. Small steps can stop big problems. Regular care saves money and time. It also keeps your vacuum running at top power.
Regular Cleaning Schedule
Clean your vacuum parts often. Empty the dust bag or bin after each use. Wipe the filters gently to remove dust. Check the brushes and rollers for hair or threads. Clean them to avoid motor strain. A clean vacuum motor runs cooler and lasts longer.
Avoiding Common Motor Damages
Do not suck up hard or sharp objects. These can damage the motor and parts inside. Avoid pulling the vacuum by the cord. This can break wires and cause short circuits. Check the power cord for cuts or wear. Replace it if damaged to prevent electric problems. Always turn off the vacuum before cleaning or fixing it. This keeps the motor safe from sudden starts.
Frequently Asked Questions
How Do I Know If My Vacuum Motor Is Faulty?
A faulty vacuum motor often causes weak suction, strange noises, or no power. Check for burning smells or overheating. Inspect the motor brushes and wiring for wear or damage. Testing with a multimeter can confirm electrical issues. Early diagnosis prevents further damage.
Can I Repair A Vacuum Motor Myself?
Yes, basic repairs like cleaning or replacing brushes are doable. Always unplug the vacuum first. Use proper tools and follow safety guidelines. More complex issues may need professional help. DIY repair saves money but requires caution and some technical knowledge.
What Causes A Vacuum Motor To Overheat?
Overheating happens due to clogged filters, blocked airflow, or motor strain. Dust buildup restricts ventilation, causing heat. Running the vacuum too long without breaks can also overheat the motor. Regular cleaning and maintenance prevent overheating and extend motor life.
How Much Does Vacuum Motor Replacement Cost?
Replacement costs vary from $50 to $150, depending on model and parts. Labor costs add if using professional repair services. Some vacuums have expensive or hard-to-find motors. Consider repair versus replacement based on overall vacuum condition.
Conclusion
Fixing a vacuum cleaner motor takes patience and care. Check the motor parts one by one. Clean or replace any damaged pieces. Test the motor after each step. Small fixes can save money and time. Keep your vacuum working like new.
Don’t rush; take your time to avoid mistakes. With the right steps, your vacuum will run smoothly again. Simple tools and clear steps make repair easier. Your vacuum will thank you with better cleaning power.