Is your vacuum cleaner not picking up dirt like it used to? A worn-out or broken belt might be the reason why.
Fixing your vacuum cleaner belt yourself can save you time and money. In this guide, you’ll learn simple steps to get your vacuum working like new again. Keep reading, and by the end, you’ll have the confidence to tackle this common problem on your own.
Signs Of A Broken Vacuum Belt
Knowing the signs of a broken vacuum belt helps fix problems fast. The belt is a small part but very important. It moves the brush roll that cleans your floor.
When the belt breaks, the vacuum does not work well. You may notice the vacuum is not picking up dirt properly. Some sounds might change too. Watch for these signs to check your vacuum belt.
Reduced Suction Power
The vacuum picks up less dirt than before. Floors stay dusty after cleaning. The vacuum feels weaker even on low settings. This drop in power can mean the belt is broken or loose.
Brush Roll Not Spinning
The brush roll is the spinning part that sweeps dirt. If it stops spinning, dirt stays on the floor. A broken belt often stops the brush roll from moving. Check under the vacuum for this problem.
Unusual Noises
Strange sounds may come from the vacuum. A high-pitched squeal or grinding noise can mean belt trouble. These noises happen because the belt slips or rubs wrong parts.
Tools And Materials Needed
Fixing a vacuum cleaner belt requires a few simple tools and materials. These help you replace the old belt and clean the vacuum for better work. Having the right items makes the process smooth and fast. Prepare these before starting your repair.
Replacement Belt
The replacement belt is the key part to fix your vacuum cleaner. Find one that fits your vacuum model exactly. Using the wrong size can cause damage or poor performance. Check the vacuum’s manual or label for the correct belt type.
Screwdriver
A screwdriver helps you open the vacuum’s cover or belt compartment. Most vacuums use Phillips or flathead screws. Choose the right screwdriver to avoid stripping the screws. Keep it handy to remove and reattach parts easily.
Cleaning Brush
A cleaning brush clears dust and debris inside the vacuum. It helps remove hair, dirt, and small particles. Cleaning the area before placing the new belt improves vacuum function. Use a soft brush to avoid damage to parts.
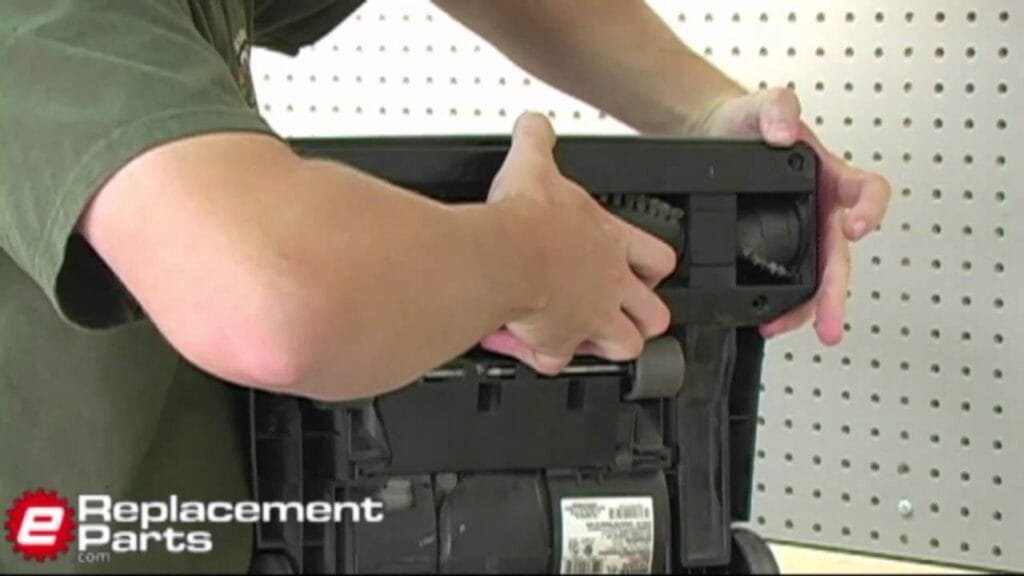
Removing The Vacuum Cleaner Belt
Removing the vacuum cleaner belt is a key step to fix many vacuum issues. The belt helps the brush roll spin and pick up dirt. Over time, the belt can wear out, stretch, or break. Replacing it keeps your vacuum working well. Follow these simple steps to remove the old belt safely and easily.
Unplugging And Preparing The Vacuum
Always unplug the vacuum before starting. This stops any chance of electric shock. Clear a flat workspace to lay the vacuum down. Check the user manual for your vacuum model. It helps to know where the belt and brush roll are located.
Accessing The Brush Roll
Flip the vacuum over to see the bottom. Find the cover or plate that holds the brush roll. Use a screwdriver or button to open the cover. Carefully remove the cover and set it aside. Now, you can see the brush roll and belt clearly.
Taking Out The Old Belt
Look for the belt wrapped around the brush roll. It may be tight or loose depending on damage. Slide the belt off the brush roll gently. Pull the belt off the motor shaft or pulley. Dispose of the old belt properly. Your vacuum is now ready for a new belt.

Credit: acevacuums.com
Installing The New Belt
Installing the new belt on your vacuum cleaner is a simple step. It needs care and attention to make sure the vacuum works well. Follow these clear steps to place the belt right. This helps the brush roll spin and pick up dirt efficiently.
Positioning The Belt On The Motor Shaft
Start by sliding the new belt onto the motor shaft. The motor shaft is the small metal rod connected to the motor. Make sure the belt fits snugly around this shaft. Avoid stretching or twisting the belt too much during this step. A well-placed belt ensures smooth motor operation.
Fitting The Belt Around The Brush Roll
Next, loop the belt around the brush roll. The brush roll is the spinning part that sweeps dirt. Hold the belt steady and carefully stretch it to fit. The belt should sit evenly on the brush roll without slipping off. Check that the belt is centered for best performance.
Ensuring Proper Tension
Proper belt tension is key to vacuum function. The belt must be tight enough to spin the brush roll. Too loose, and it slips. Too tight, and it wears out fast. Press the brush roll down gently. The belt should feel firm but not overly tight. Adjust if needed before closing the vacuum.
Reassembling And Testing
After fixing the vacuum cleaner belt, reassembling and testing the parts is key. This step ensures the vacuum works well and lasts longer. Careful reassembly prevents damage and helps find any issues early.
Replacing The Brush Roll Cover
Put the brush roll cover back in place carefully. Align it with the vacuum base. Press down gently until you hear a click. This locks the cover securely. Do not force it. Check that the cover sits flat and tight.
Plugging In And Powering On
Plug the vacuum into a power outlet. Make sure the cord is safe and not twisted. Turn on the vacuum using the power button. Listen for normal motor sounds. If the vacuum does not start, double-check the plug and switch.
Checking Brush Roll Movement
Look under the vacuum to see the brush roll. It should spin smoothly without stopping. Push the vacuum forward a little. The brush roll must rotate with no noise or jerkiness. If it sticks, recheck the belt installation or clean the brush roll.

Credit: www.youtube.com
Maintenance Tips To Extend Belt Life
Extending the life of your vacuum cleaner belt saves money and keeps your vacuum working well. Simple maintenance steps help prevent belt wear and breakage. These tips keep the belt strong and the vacuum running smoothly.
Follow easy habits to protect the belt and avoid common problems. Regular care makes a big difference in belt durability.
Regular Cleaning Of Brush Roll
Clean the brush roll often to stop dirt buildup. Dust and debris can make the belt work harder. Use scissors or a brush to remove stuck dirt. A clean brush roll lets the belt turn freely. This lowers the risk of belt slipping or breaking.
Avoiding Hair And Debris Build-up
Hair and threads wrap around the brush roll fast. These tangles strain the belt and motor. Remove hair and debris carefully after each use. Use tweezers or a comb for tight spots. Clear brush roll parts help the belt last longer.
Periodic Belt Inspections
Check the belt for cracks, stretches, or tears regularly. A weak belt can break suddenly during cleaning. Replace the belt if it looks worn or loose. Tight belts improve suction and cleaning power. Inspecting often prevents vacuum breakdowns.

Credit: www.amazon.com
Frequently Asked Questions
How Do I Know If My Vacuum Cleaner Belt Is Broken?
If your vacuum brush roller stops spinning, the belt may be broken. Check for visible cracks or looseness. A broken belt often causes strange noises or reduced suction. Inspect the belt regularly to ensure proper vacuum performance.
Can I Replace A Vacuum Cleaner Belt Myself?
Yes, you can replace a vacuum belt by following the manufacturer’s instructions. Turn off and unplug the vacuum first. Remove the brush cover, take out the old belt, and install a new one. It’s a simple and cost-effective repair.
How Often Should I Change My Vacuum Cleaner Belt?
Replace the vacuum belt every 6 to 12 months, depending on usage. Frequent vacuuming or heavy dirt can wear out the belt faster. Regular checks help prevent damage to the brush roller and maintain cleaning efficiency.
What Causes Vacuum Cleaner Belts To Wear Out Quickly?
Vacuum belts wear out due to dirt, debris, and friction. Overstretching or improper installation also shortens belt life. Using the vacuum on thick carpets or hard floors affects belt durability. Regular maintenance extends belt lifespan.
Conclusion
Fixing a vacuum cleaner belt is easier than it seems. Follow the steps carefully and take your time. Using the right tools helps avoid damage. Check the belt regularly to keep your vacuum working well. A small repair can save money and extend your vacuum’s life.
Stay patient and work slowly for the best results. Now, your vacuum will clean better and last longer. Simple fixes make a big difference. Try it yourself and enjoy a cleaner home.