A broken vacuum cleaner belt can be a hassle. Luckily, it’s often easy to fix.
Vacuum cleaners are essential for keeping our homes clean. When the belt breaks, it stops the vacuum from working properly. Knowing how to repair a broken vacuum cleaner belt can save you time and money. In this blog post, we will explore the best methods to repair a broken vacuum cleaner belt.
You don’t need to be an expert to follow these steps. With a few simple tools and a bit of patience, you can get your vacuum back to work in no time. Let’s get started and make your vacuum cleaner as good as new!
Identifying Broken Vacuum Cleaner Belts
Is your vacuum cleaner not working as efficiently as it once did? It might be due to a broken belt. Identifying the signs of a broken vacuum cleaner belt early can save you a lot of hassle. Below, you’ll find some practical tips to determine if your vacuum cleaner belt needs repair.
Signs Of Belt Damage
First, pay attention to unusual noises. If your vacuum cleaner starts making loud or strange sounds, it could be a sign that the belt is damaged.
Another indicator is poor suction. If your vacuum isn’t picking up dirt like it used to, a broken belt might be the culprit.
You might also notice a burning smell. This can happen when the belt is slipping or struggling to rotate properly.
Visual Inspection Tips
To visually inspect the belt, unplug your vacuum cleaner first for safety. Then, remove the bottom plate or cover to access the belt.
Check for cracks, fraying, or stretching. A healthy belt should be taut and free from visible damage.
Rotate the brush roll manually. If it doesn’t move smoothly, the belt might be broken or misaligned.
Regular inspection can prevent bigger issues down the line. So, when was the last time you checked your vacuum cleaner belt? Taking a few minutes to look can save hours of frustration later.
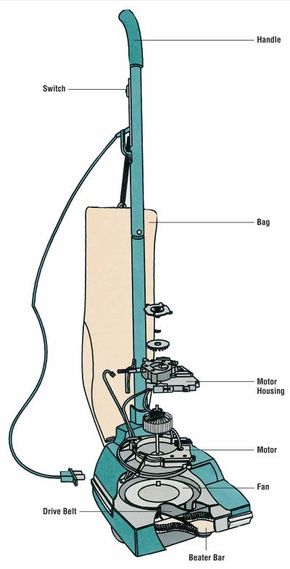
Credit: home.howstuffworks.com
Tools Needed For Belt Repair
Repairing a broken vacuum cleaner belt can seem daunting. With the right tools, it becomes much easier. This guide will help you understand the essential and optional tools needed for the repair. Let’s dive into the details.
Essential Tools
To repair a vacuum cleaner belt, you need a few basic tools. Here are the essentials:
- Screwdriver: A flathead or Phillips screwdriver will help you open the vacuum.
- Replacement Belt: Ensure you have the correct belt for your vacuum model.
- Cleaning Brush: A small brush is useful for removing debris.
Optional Tools
Some additional tools can make the repair process smoother. Although not essential, they can be helpful:
- Needle-nose Pliers: Useful for gripping and pulling out small parts.
- Compressed Air: Helps to blow out dust and debris.
- Lubricant: Keeps the moving parts functioning smoothly.
Safety Precautions
Always unplug the vacuum cleaner before starting repairs to avoid electric shock. Wear safety gloves to protect your hands from sharp parts. Keep a clean workspace to prevent accidents.
When it comes to repairing broken vacuum cleaner belts, safety should always be your top priority. You don’t want a simple fix to turn into a dangerous situation. By taking a few basic precautions, you can ensure that your repair job goes smoothly and safely.Power Off The Vacuum
First things first, make sure the vacuum is completely powered off.Unplug it from the electrical outlet to eliminate any risk of electric shock.This step might seem obvious, but it’s easy to overlook when you’re in a hurry.I once skipped this step and got a mild shock when I touched the motor. That was a lesson I won’t forget!Wear Protective Gear
Next, gear up with some basic protective equipment.Wearing gloves can protect your hands from sharp edges or debris inside the vacuum.Safety glasses are a good idea too, especially if you need to cut or pull out the old belt.Better safe than sorry, right?Have you ever tried fixing something and ended up with a scratch or worse? Simple protective gear can prevent that.When you’re prepared, you can focus on the repair without worrying about your safety.Taking these simple precautions can make the difference between a smooth repair and a trip to the emergency room.What other safety measures do you follow when fixing appliances? Share your tips in the comments below!
Credit: www.thinkvacuums.com
Removing The Damaged Belt
Removing the damaged belt from your vacuum cleaner is a crucial step in its repair. This process ensures your vacuum cleaner can run smoothly once a new belt is installed. Follow these steps to efficiently remove the old, broken belt from your vacuum cleaner.
Accessing The Belt Area
To start, unplug your vacuum cleaner from the power source. Safety first. Lay the vacuum on its back to access the bottom panel. Use a screwdriver to remove any screws securing the bottom cover. Set aside the screws in a safe place. Gently lift off the bottom cover to reveal the belt area. This might take a bit of wiggling, but it should come off easily.
Steps To Remove The Belt
Once you have accessed the belt area, locate the broken belt. It’s usually around the motor shaft and the brush roll. Carefully slide the belt off the motor shaft. Next, remove it from the brush roll. Sometimes, the belt may be stuck. In such cases, use a pair of scissors to cut it. Dispose of the old belt properly. You are now ready to install the new belt.
Choosing The Right Replacement Belt
When your vacuum cleaner belt breaks, choosing the right replacement is crucial for optimal performance. A mismatched belt can lead to more issues, wasting time and money. Let’s dive into the key factors for picking the perfect replacement belt.
Matching Belt Size
The first step is to ensure the replacement belt matches the size of the original. Check the vacuum cleaner’s manual or the old belt for sizing information. Using a belt that’s too tight or too loose can cause the vacuum to malfunction.
I once used an incorrect belt size, thinking it would work just fine. My vacuum cleaner started making weird noises and eventually stopped working altogether. Lesson learned—always match the belt size exactly.
Quality Considerations
The quality of the belt is equally important. Not all belts are created equal; some are made of better materials and last longer. Opt for belts from reputable brands or those recommended by your vacuum cleaner’s manufacturer.
Think about this: would you rather replace a cheap belt multiple times or invest in a high-quality one that lasts longer? The latter saves you time and hassle in the long run. What kind of belt would you choose for your vacuum?
By focusing on these aspects, you can ensure your vacuum cleaner runs smoothly and efficiently. Don’t underestimate the importance of the right replacement belt. It makes all the difference.

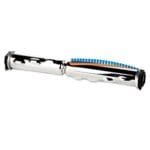
Credit: www.reddit.com
Installing The New Belt
Installing the new belt in your vacuum cleaner is a crucial step in ensuring it functions effectively. This can seem daunting, but with a bit of patience and the right technique, you can easily manage it. Let’s break down the process into simple, manageable steps.
Aligning The Belt
First, make sure the new belt is the correct size for your vacuum model. A mismatched belt can cause more damage.
Start by placing one end of the belt around the motor shaft. You might need to slightly stretch the belt to fit it properly.
Next, align the other end of the belt with the brush roller. Ensure that the belt fits snugly around both the motor shaft and the roller.
Securing The Belt In Place
Once the belt is aligned, it’s time to secure it. Gently rotate the brush roller to make sure the belt is seated correctly.
If the belt slips off, readjust it until it stays in place. This might require a few tries, so don’t get frustrated.
Finally, reassemble the vacuum cleaner. Make sure all screws and parts are tightly secured. A loose part can affect the performance of the vacuum.
Have you ever struggled with replacing a vacuum cleaner belt? What tips have you found helpful? Share your experiences in the comments below!
Testing The Vacuum Cleaner
After replacing a broken vacuum cleaner belt, it’s crucial to test the vacuum cleaner to ensure everything is working correctly. This step helps confirm that the belt is properly installed and the vacuum is functioning as it should. Let’s dive into the essential steps to test your vacuum cleaner effectively.
Powering On
First, plug your vacuum cleaner into a power outlet. Make sure the power switch is in the ‘off’ position before doing this. This precaution helps avoid any unexpected starts.
Once plugged in, turn on the vacuum cleaner. Listen carefully for any unusual noises. A smooth, consistent sound indicates that the belt is in place and the motor is running correctly.
Checking For Proper Function
Next, place the vacuum cleaner on a carpeted area. Push it forward and backward to check if the brush roll is spinning smoothly. The brush roll should move freely without any resistance.
If the vacuum isn’t picking up debris or the brush roll isn’t spinning, double-check the belt installation. Sometimes, the belt may slip off or not be tightly secured.
You can also test the suction by lifting the vacuum slightly off the ground. Feel the airflow at the bottom. Strong suction is a sign that everything is working as it should.
Remember, testing your vacuum cleaner after repairing the belt is a crucial step to ensure long-term performance. Have you ever missed this step and faced issues later? Share your thoughts and experiences in the comments below!
Maintenance Tips To Prevent Belt Damage
Regularly check vacuum cleaner belts for wear and tear. Replace damaged belts promptly to keep your vacuum working efficiently. This ensures long-lasting performance and prevents further damage.
Keeping your vacuum cleaner in top shape can save you time and money. A common issue is a broken belt, which affects suction and overall performance. The good news is, with regular maintenance, you can prevent belt damage and ensure your vacuum runs smoothly. Let’s dive into some key maintenance tips.Regular Cleaning
Regular cleaning is crucial. Dust and debris can accumulate around the belt, causing friction and wear. Clean the vacuum’s brush roll and belt area at least once a month.Use a small brush or cloth to remove debris. Pay extra attention to hair and string, which can wrap around the belt. Regular cleaning keeps the belt in good condition and extends its life.Proper Storage
Proper storage is often overlooked but essential. Store your vacuum in a cool, dry place. Avoid places with extreme temperatures or humidity, as they can degrade the belt material.Ensure the vacuum is not stored with the belt under tension. Release the belt if possible, or place the vacuum in a position that doesn’t strain the belt. Proper storage can significantly reduce wear and tear.What are your go-to maintenance tips? Share them in the comments below!Frequently Asked Questions
Can You Repair A Broken Vacuum Belt?
Yes, you can repair a broken vacuum belt. First, unplug the vacuum and remove the broken belt. Replace it with a new one following the manufacturer’s instructions. Ensure it is properly aligned for optimal performance.
Can You Tape A Vacuum Belt Back Together?
No, you cannot tape a vacuum belt back together. It won’t hold and may damage your vacuum. Replace the belt instead.
What Can You Use Instead Of A Vacuum Belt?
You can use a rubber band, zip tie, or string as a temporary replacement for a vacuum belt.
Why Does My Vacuum Belt Keep Breaking?
Your vacuum belt keeps breaking due to overloading, worn-out belts, or incorrect installation. Regularly check and replace the belt.
Conclusion
Fixing vacuum cleaner belts doesn’t have to be hard. Use the right tools. Follow the steps carefully. Save money by doing it yourself. Regular checks can prevent bigger issues. Enjoy a cleaner home with a working vacuum. Happy cleaning!