Is your vacuum cleaner brush not spinning like it used to? When your brush stops working, cleaning becomes harder and more time-consuming.
But don’t worry—you don’t need to spend money on a new vacuum just yet. You’ll learn simple and effective ways to fix your vacuum cleaner brush yourself. By following easy steps, you can get your vacuum back to its full power quickly.
Keep reading, and you’ll save time, effort, and maybe even a repair bill!

Credit: ilifecare.in
Common Brush Problems
Vacuum cleaner brushes face many common problems during use. These issues reduce cleaning power and can damage your vacuum. Knowing these problems helps you fix the brush quickly. It also keeps your vacuum working well for longer.
Brush Not Spinning
The brush may stop spinning due to a broken belt or motor issue. Dirt or hair can block the brush from turning. Check the belt for wear or breakage. Remove any debris wrapped around the brush bar. Replace the belt if needed to restore spinning.
Clogged Bristles
Bristles often get clogged with hair, string, or dust. This lowers cleaning efficiency and may strain the motor. Use scissors to cut tangled hair carefully. Pull out stuck debris by hand or with tweezers. Clean bristles regularly to keep them clear and effective.
Worn Out Brushes
Brushes wear down after long use. Worn bristles do not pick up dirt well. Check the bristles for signs of fraying or flattening. Replace the brush bar or brush head if bristles look damaged. Fresh brushes improve vacuum performance and protect floors.
Brush Bar Noise
Noisy brushes often mean debris is stuck or parts are loose. Listen for grinding or rattling sounds. Turn off the vacuum and inspect the brush bar. Tighten loose screws or remove trapped objects. Regular maintenance reduces noise and keeps the brush running smoothly.

Credit: www.youtube.com
Tools Needed For Repair
Fixing a vacuum cleaner brush requires the right tools. Having the correct tools makes the repair easier and faster. It helps avoid damage to the vacuum or brush parts. The tools needed are simple and easy to find. This section covers the basic hand tools, replacement parts, and cleaning supplies needed for repair.
Basic Hand Tools
Start with a small screwdriver set. Phillips and flathead screwdrivers work best. Pliers help to pull out stuck parts. A wrench or socket set may be needed for nuts. A pair of scissors or a utility knife is useful. These tools let you open the vacuum and remove the brush.
Replacement Parts
Brushes wear out or break over time. Replacement brushes match your vacuum model. Belts connect the motor to the brush. These belts can snap or stretch. Buy the right belt size for your vacuum. Screws and small clips may need replacing too. Keep extra parts for future repairs.
Cleaning Supplies
Cleaning helps improve brush performance. Use a soft cloth to wipe dust. A small brush clears hair and dirt from bristles. Rubbing alcohol removes sticky grime. Compressed air blows out tiny debris. These supplies keep the brush clean and working well.
Step-by-step Brush Cleaning
Cleaning the vacuum cleaner brush keeps it working well and extends its life. Dirt and hair can get stuck, making the brush less effective. Follow these simple steps to clean the brush bar properly. This will help your vacuum pick up dust and debris better.
Removing The Brush Bar
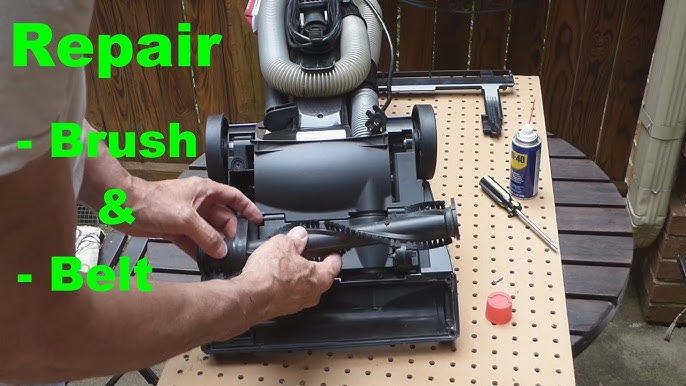
Turn off and unplug the vacuum first. Flip it over to see the brush bar. Find the screws or clips holding the brush in place. Use a screwdriver to remove screws carefully. Lift out the brush bar slowly. Keep track of all parts to avoid losing them.
Clearing Hair And Debris
Look closely for hair wrapped around the brush. Use scissors or a knife to cut through tangled hair. Pull out all hair and threads by hand. Remove dust and debris stuck between bristles. Check the brush ends for trapped dirt. Clean these areas well for smooth spinning.
Washing And Drying The Brush
Fill a basin with warm, soapy water. Dip the brush bar and scrub gently with a brush. Avoid soaking parts with bearings or metal components. Rinse the brush under clean water. Shake off excess water and dry with a towel. Let the brush air dry completely before reinstalling.

Credit: www.youtube.com
Fixing A Non-spinning Brush
A vacuum cleaner brush that does not spin can reduce cleaning power. Fixing this issue helps your vacuum work like new. Most often, the problem lies with the belt or motor. Follow these steps to find and fix the cause quickly.
Checking The Belt
Unplug the vacuum before opening the brush cover. Look for the belt that connects the brush to the motor. If the belt is loose, cracked, or broken, it cannot turn the brush. A worn belt often causes the brush to stop spinning. Check if the belt is still tight and in good shape.
Replacing The Belt
Remove the old belt from the brush and motor pulleys. Buy a replacement belt that fits your vacuum model. Place the new belt around the motor pulley first. Then stretch it over the brush roller. Make sure the belt sits firmly without slipping. Close the brush cover and test the brush by turning on the vacuum.
Inspecting The Motor
If the belt is fine, the motor might have a problem. Listen for unusual sounds or no sound at all. The motor may be jammed or worn out. Remove debris blocking the motor or brush roller. Clean the brush bearings to help it spin freely. Replace the motor if it does not run after cleaning.
Replacing Worn Brushes
Replacing worn brushes in your vacuum cleaner keeps it working well. Brushes help pick up dust and dirt from floors. Over time, they wear out and stop cleaning properly. Changing the brushes is a simple way to fix this problem. It saves money and improves cleaning power.
Identifying Brush Wear
Check the brush for signs of wear. Look for missing bristles or uneven patches. Brushes may look flat or smooth instead of full and thick. If the vacuum does not pick up dirt well, brushes might be the cause. Inspect the brush roll carefully every few months.
Choosing The Right Replacement
Find brushes that match your vacuum model. Use the manual or check the manufacturer’s website. Choose brushes made from durable materials like nylon. Avoid generic brushes that do not fit well. Proper fit ensures the vacuum works at its best.
Installing New Brushes
Turn off and unplug the vacuum before starting. Remove the old brushes by loosening screws or clips. Slide out the worn brush roll carefully. Insert the new brushes in the same position. Secure them tightly and check for smooth rotation. Test the vacuum to confirm the fix.
Preventive Maintenance Tips
Preventive maintenance keeps your vacuum cleaner brush working well for a long time. It stops problems before they start. Simple habits protect the brush and improve cleaning power. Follow these easy tips to avoid damage and save money on repairs.
Regular Cleaning Schedule
Clean the brush after every few uses. Remove hair, string, and dirt stuck in bristles. Use scissors or your fingers to pull out debris gently. Check the brush for worn or broken parts often. A clean brush picks up dust better and lasts longer.
Avoiding Brush Damage
Do not vacuum hard or sharp objects. Stones, glass, or metal bits can break bristles. Avoid pushing the vacuum too hard on carpets or floors. Brush damage lowers cleaning quality and may stop spinning. Handle the vacuum with care to keep the brush safe.
Storing The Vacuum Properly
Store your vacuum in a dry place away from heat. Keep it upright to prevent pressure on the brush. Avoid wrapping the cord tightly around the vacuum. Proper storage protects the brush and motor from damage. A good storage habit extends your vacuum’s life.
Frequently Asked Questions
How Do I Fix A Vacuum Cleaner Brush Not Spinning?
Check for hair or debris wrapped around the brush. Clean the brush roll and remove any blockages. Inspect the belt for wear and replace it if broken or loose to restore spinning.
What Causes Vacuum Brush To Stop Rotating?
A broken or stretched belt, tangled hair, or debris often stops the brush from rotating. Motor or brush roll damage can also cause this issue.
Can I Replace The Vacuum Cleaner Brush Roll Myself?
Yes, replacing the brush roll is simple. Unplug the vacuum, remove the base plate, take out the old brush roll, and install the new one.
How Often Should I Clean My Vacuum Brush Roll?
Clean your brush roll every 1-3 months, depending on usage. Regular cleaning prevents clogs and maintains optimal vacuum performance.
Conclusion
Fixing your vacuum cleaner brush saves time and money. Regular cleaning keeps it working well. Check for hair, threads, and dirt often. Tighten loose parts to avoid problems. Small repairs stop bigger issues later. Keep your vacuum ready for every clean.
Simple steps make a big difference. Enjoy a cleaner home with less effort. Try these tips and see the results. Your vacuum will thank you.


