Is your Shark vacuum not picking up dirt like it used to? The problem might be a worn-out belt.
Changing the belt on your Shark vacuum is easier than you think, and doing it yourself can save you time and money. In this guide, you’ll learn simple, step-by-step instructions to replace your vacuum belt quickly and get your machine running like new again.
Keep reading to fix your vacuum and enjoy a cleaner home without hassle.
Signs A Belt Needs Replacement
The belt in your Shark vacuum is a small but important part. It helps spin the brush roll to pick up dirt and dust. Over time, the belt can wear out or break. Knowing the signs that the belt needs replacement can save you time and keep your vacuum working well.
Watch for changes in how your vacuum cleans and sounds. These clues show the belt may be damaged or loose. Catching these early helps prevent bigger problems. Here are the main signs to check.
Loss Of Suction Power
Your vacuum may lose suction if the belt is worn. A loose or broken belt can stop the brush roll from turning. Without the brush roll spinning, the vacuum cannot pick up dirt well. The vacuum may feel weaker than usual. This drop in suction is a key sign to check the belt.
Brush Roll Not Spinning
Look under your vacuum to see if the brush roll moves. The belt connects the motor to the brush roll. If the belt breaks, the brush roll will stop spinning. Dirt and hair can get stuck on the brush roll. If it does not spin, the vacuum will not clean carpets or floors properly.
Unusual Noises
Listen for strange sounds while using your vacuum. A slipping or broken belt can make a high-pitched squeal. You might also hear a grinding noise. These sounds mean the belt is not working well. Noises like these should not be ignored.
Tools Required
Changing the belt on a Shark vacuum requires a few basic tools. Having the right tools makes the process easier and faster. Preparation helps avoid frustration and mistakes. Keep these tools ready before you start.
Screwdriver Types
You will need a screwdriver to open the vacuum’s cover. Most Shark vacuums use Phillips-head screws. A Phillips screwdriver fits these screws perfectly. Sometimes, you might need a flat-head screwdriver for clips or other parts. Check your vacuum’s screws first. Using the correct screwdriver prevents damage to the vacuum.
Replacement Belt Specifications
Choosing the correct replacement belt is important. Use a belt made specifically for Shark vacuums. The size and fit must match the original belt exactly. Look for the belt model number in your vacuum manual. Using the wrong belt can cause poor performance or damage. Buy a belt designed for your vacuum model.
Preparing The Vacuum
Preparing your Shark vacuum is the first step to changing the belt safely. It helps avoid damage and keeps you safe while working. Taking time to prepare makes the process smooth and easier.
Unplugging The Device
Always unplug the vacuum before starting any work. This stops the vacuum from turning on by mistake. It protects you from electric shock. Find the power cord and pull the plug from the wall socket. Double-check that the vacuum is off and unplugged before moving to the next step.
Removing The Dust Canister
Take out the dust canister to access the belt area. Press the release button or latch near the canister. Gently pull the canister away from the vacuum body. Empty the dust if needed to avoid mess. Keep the canister aside in a clean space while you work on the belt.
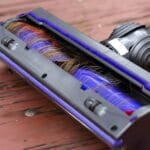
Accessing The Brush Roll
Accessing the brush roll is the first step to change a belt on a Shark vacuum. The brush roll is located at the bottom of the vacuum. It collects dirt and debris from your floors. Before replacing the belt, you need to reach this part safely and easily.
Removing The Bottom Plate
Turn off the vacuum and unplug it for safety. Flip the vacuum over to see the bottom plate. This plate covers the brush roll and belt. Use a screwdriver or your hands to remove the screws or clips holding the plate. Keep the screws safe for later. Lift the bottom plate away carefully. Now, the brush roll is visible and ready for the next step.
Taking Out The Brush Roll
Look for the brush roll at the center. It may be held by end caps or clips. Gently pull or slide the brush roll out of its slot. Be careful not to force it or damage the vacuum. Check the brush roll for dirt or hair and clean it if needed. Removing the brush roll allows you to access the belt underneath easily.
Removing The Old Belt
Removing the old belt from your Shark vacuum is the first step in replacing it. This task requires careful handling to avoid damage. Follow the steps below to remove the belt safely and prepare for a new one.
Loosening The Belt
Start by unplugging your vacuum for safety. Locate the belt cover on the bottom of the vacuum. Use a screwdriver to remove the screws holding the cover in place. Gently lift the cover off to expose the belt. The belt may feel tight, so carefully stretch it to loosen it from the brush roll. Avoid pulling too hard to prevent snapping the belt or damaging parts.
Detaching From Motor Shaft
Next, find the motor shaft where the belt loops around. Slide the belt off the brush roll first, then carefully pull it away from the motor shaft. The belt may stick slightly, so work it loose with gentle wiggling. Once free, remove the belt completely from the vacuum. Keep the old belt for size comparison when fitting the new one.
Installing The New Belt
Installing the new belt on your Shark vacuum is simple. Take your time and follow each step carefully. Proper installation ensures the vacuum works well and lasts longer.
Positioning On Motor Shaft
Start by slipping the new belt onto the motor shaft. Hold the belt steady and slide it over the small metal shaft. Make sure the belt fits snugly but not too tight. This keeps the belt from slipping off during use.
Aligning With Brush Roll
Next, stretch the belt over the brush roll. Turn the brush roll gently to help the belt settle evenly. The belt should sit straight without twisting. Proper alignment helps the brush roll spin smoothly and cleans better.
Reassembling The Vacuum
Reassembling your Shark vacuum is the final step after changing the belt. This process puts all parts back in place. It ensures your vacuum works correctly and safely.
Take your time. Check each part carefully. Proper reassembly helps the vacuum run smoothly and last longer.
Replacing The Brush Roll
Start by placing the brush roll back into its slot. Align the ends with the side holders. Make sure the belt fits around the brush roll properly. The belt should be tight but not stretched. Spin the brush roll by hand to check movement. It should turn freely without resistance.
Securing The Bottom Plate
Next, position the bottom plate over the brush roll and belt. Align the plate with the vacuum base holes. Press down gently to fit it snugly. Insert and tighten all screws firmly. This keeps the plate stable during use. Double-check that no parts are loose before finishing.
Testing The Vacuum
Testing the vacuum after changing the belt is important. This step makes sure the vacuum works correctly. It helps find any problems early. Follow these simple checks to confirm your Shark vacuum is ready to clean.
Powering On
Plug in the vacuum and press the power button. Listen for the motor sound. It should start smoothly without strange noises. If it does not turn on, check the power source and connections. A working motor means the vacuum is ready for the next step.
Checking Brush Roll Movement
Look under the vacuum to see the brush roll. It should spin freely when the vacuum is on. If it stays still, the belt might not be installed right. Turn off the vacuum and check the belt again. The brush roll must turn to clean well.
Maintenance Tips
Maintaining your Shark vacuum belt ensures the machine runs smoothly and lasts longer. Simple care steps prevent damage and keep suction strong. Regular maintenance helps avoid costly repairs and keeps cleaning efficient.
Regular Belt Inspections
Check the belt every month for signs of wear or damage. Look for cracks, stretching, or fraying. A worn belt can slip or break, reducing vacuum power. Replace the belt immediately if you find any issues. This keeps your vacuum running at full strength.
Cleaning The Brush Roll
Remove hair, string, and debris wrapped around the brush roll. This prevents the belt from slipping or breaking. Use scissors or a brush to clean the roll carefully. Clean the brush roll regularly to maintain strong suction and belt life. A clean brush roll helps the vacuum work better on all floors.
Frequently Asked Questions
How Do I Know When To Change Shark Vacuum Belt?
Check if the brush roll stops spinning or vacuum loses suction. Visible wear or breakage on the belt also indicates replacement.
What Tools Are Needed To Replace Shark Vacuum Belt?
You typically need a screwdriver and replacement belt. Some models may require no tools, just manual removal of parts.
How To Safely Remove The Old Belt On Shark Vacuum?
Unplug the vacuum first. Remove the brush roll cover carefully and slide off the worn belt from the brush roll.
Can I Use Any Belt For My Shark Vacuum?
No, always use a belt designed for your specific Shark model. Using wrong belts can damage the vacuum or reduce performance.
Conclusion
Changing a belt on a Shark vacuum is simple and quick. Follow the steps carefully to avoid mistakes. Keep your vacuum running smoothly with a new belt. Regular maintenance helps your vacuum clean better. You can save money by fixing it yourself.
No need to wait for professional help. Just take your time and work carefully. Your Shark vacuum will work like new again. Keep the instructions handy for future belt changes. This small task makes a big difference in cleaning.