Is your Shark vacuum not picking up dirt like it used to? A clog can slow it down or stop it completely, but you don’t have to struggle with a heavy, useless machine.
You can fix it yourself quickly and easily. In this guide, you’ll discover simple steps to unclog your Shark vacuum and get it working like new again. Keep reading, and you’ll save time, money, and frustration—no expert needed.
Signs Of A Clogged Shark Vacuum
A clogged Shark vacuum shows clear signs. Recognizing these signs helps fix problems fast. It keeps your vacuum working well and extends its life.
Check your vacuum for these signs regularly. They tell you when cleaning is needed.
Reduced Suction Power
Your vacuum may not pick up dirt well. It feels weaker than before. Floors and carpets stay dirty after cleaning. Dirt stuck inside blocks air flow. This lowers suction power noticeably.
Unusual Noises
Strange sounds come from the vacuum. It may buzz, rattle, or sound louder. Clogs create pressure on the motor. This causes the vacuum to make odd noises. Pay attention to new or strange sounds.
Overheating Issues
The vacuum gets hot quickly during use. It may shut off on its own. Overheating happens when airflow is blocked. The motor works harder to run. This can damage your vacuum if not fixed.
Tools Needed For Unclogging
Unclogging a Shark vacuum requires the right tools. Having these tools ready makes the process easier and faster. These tools help reach tight spots and remove dirt safely. Before starting, gather everything needed for smooth work.
Basic Cleaning Tools
A small brush helps remove dust and hair from parts. A pair of scissors or a seam ripper cuts tangled threads carefully. A soft cloth cleans surfaces without scratching. A screwdriver may be needed to open certain vacuum parts. These tools work together to clear clogs effectively.
Safety Equipment
Wear gloves to protect your hands from sharp edges. Use safety glasses to keep dust out of your eyes. Make sure the vacuum is unplugged before starting work. Safety keeps the process safe and prevents injuries.
Preparing The Vacuum
Preparing your Shark vacuum before unclogging is key to a smooth process. Start with safety to avoid accidents. Then, take it apart carefully to find the blockage. This step saves time and protects your vacuum from damage.
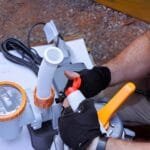
Unplugging And Disassembling
Always unplug the vacuum before you start. This stops any electric shocks or injuries. Next, remove the dust cup or dirt bin. Take off the hose or wand if needed. Use your hands or a screwdriver, depending on the model. Keep track of all parts to reassemble later.
Locating The Clog
Look inside the dust cup for dirt build-up. Check the hose for any blockages. Shine a light inside to see clearly. Feel for any hard spots or stuck debris. Clear the clog gently with a stick or brush. Avoid sharp tools that can break the vacuum parts.
Removing Blockages
Removing blockages is key to keeping your Shark vacuum working well. Dirt, hair, and debris can clog parts and reduce suction. Clear these blockages often to keep cleaning strong.
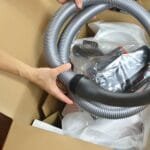
Clearing The Hose
Detach the hose from the vacuum carefully. Look inside for visible clogs like dust or hair. Use a long stick or broom handle to push out blockages. Avoid sharp tools that could damage the hose. After clearing, reattach the hose firmly.
Cleaning The Brush Roll
Turn the vacuum over to access the brush roll. Remove hair and threads wrapped around it by hand or with scissors. Check for stuck debris under the brush. Clean the brush roll regularly to keep it spinning freely. Replace the brush roll if it is worn out.
Emptying The Dust Cup
Press the release button to remove the dust cup. Empty all dirt and debris into a trash bin. Wipe the inside of the cup with a damp cloth if needed. Make sure the dust cup is dry before placing it back. Regular emptying prevents blockages and keeps suction strong.
Reassembling And Testing
After clearing the clog, reassembling your Shark vacuum is the next step. This process needs care. Proper assembly ensures the vacuum works well. Take your time to put all parts back correctly.
Putting Parts Back Together
Start by aligning all parts carefully. Match each piece to its original spot. Snap or screw parts firmly but gently. Avoid forcing parts to prevent damage. Check seals and filters for proper fit. Make sure the brush roll spins freely. Tighten any loose screws. A well-assembled vacuum prevents future problems.
Running A Test Clean
Plug in the vacuum and turn it on. Listen for unusual noises or weak suction. Move the vacuum over a small area. Watch how it picks up dirt and debris. If suction feels low, check for missed blockages. Test the brush roll to ensure it spins well. This quick test confirms your vacuum is ready.
Preventing Future Clogs
Preventing future clogs in your Shark vacuum saves time and keeps it working well. Small efforts can stop dirt and hair from blocking the machine. A clean vacuum cleans better and lasts longer. Follow easy steps to keep your vacuum clear and ready.
Regular Maintenance Tips
Empty the dust cup after each use. Check the brush roll for hair or string. Clean the filters every month. Use a soft brush or cloth to remove dust from vents. Look inside the vacuum hose for blockages. Replace filters as the manual suggests. Keep all parts dry to avoid damage.
Proper Usage Advice
Vacuum only dry debris. Avoid sucking large objects or liquids. Pick up small pieces of paper or plastic by hand first. Do not overfill the dust cup. Use the right vacuum setting for the floor type. Avoid running the vacuum over thick cords or rugs. Turn off the vacuum before clearing blockages.
When To Seek Professional Help
Knowing when to seek professional help for your Shark vacuum saves time and stress. Some problems need expert care beyond basic cleaning. Detecting these early keeps your vacuum working well for longer.
Persistent Problems
If your vacuum clogs again after cleaning, it signals a deeper issue. Strange noises or loss of suction also show something is wrong. Avoid using the vacuum too much if these happen. Continuous problems can cause more damage over time.
Warranty And Repair Options
Check your Shark vacuum’s warranty before trying repairs. Many defects or faults are covered and repaired for free. Contact Shark customer service to learn about repair centers near you. Using authorized repair helps keep your warranty valid.
Frequently Asked Questions
How Do I Know If My Shark Vacuum Is Clogged?
If suction weakens or debris stays inside, your Shark vacuum might be clogged. Check the hose, brush roll, and filters for blockages.
What Is The Easiest Way To Unclog A Shark Vacuum?
Turn off and unplug the vacuum. Remove and inspect the hose and brush roll. Clear any debris or hair causing clogs carefully.
Can Clogged Filters Affect Shark Vacuum Performance?
Yes, dirty or clogged filters reduce suction power. Clean or replace filters regularly to maintain optimal vacuum performance and prevent clogging.
How Often Should I Clean My Shark Vacuum To Prevent Clogs?
Clean your Shark vacuum after every few uses. Regularly check the hose, brush roll, and filters to prevent dirt buildup and clogs.
Conclusion
Keeping your Shark vacuum clean helps it work well for longer. Regularly checking for clogs saves time and effort. Follow these easy steps to remove blockages quickly. Doing this often keeps your home cleaner and your vacuum strong. Small actions prevent big problems later.
Take care of your vacuum, and it will take care of your floors. Simple maintenance makes a big difference every day.